In the digital realm, speed is not just a feature; it’s the foundation of a great user experience. A slow-loading website can be the difference between a new customer and a lost opportunity. While many factors contribute to website performance, one of the most powerful yet often misunderstood is caching. This guide will demystify website caching, breaking down its various forms and showing you how to leverage it to create a faster, more responsive website.
Key Takeaways
Caching is Your Site’s Short-Term Memory: It stores copies of your website’s files (images, code, HTML) closer to the user, dramatically speeding up load times for repeat visits by reducing server requests and network latency.
Caching is a Multi-Layered Strategy: Effective caching isn’t one-size-fits-all. It involves a stack of technologies working together, from the user’s own browser (Client-Side) to your web server (Server-Side) and the global networks in between (DNS & CDN).
Caching Directly Boosts Core Web Vitals & SEO: By reducing server response times and speeding up resource delivery, caching has a massive positive impact on Largest Contentful Paint (LCP), user experience, and, consequently, your Google search rankings.
Prefetching is the Next Frontier: While caching optimizes repeat visits, predictive prefetching makes future navigations feel instantaneous, solving a key UX gap that caching alone cannot address.
The Need for Speed: An Introduction to Website Caching
In the digital world, speed isn’t just a feature; it’s the foundation of a good user experience. A slow, clunky website is the modern equivalent of a locked door-it turns away potential customers before they even see what you have to offer. The data is clear: even a one-second delay in page load time can lead to a 7% reduction in conversions, and more than half of all mobile users will abandon a page that takes longer than three seconds to load. This is where website caching comes in. It is one of the most powerful and fundamental techniques for making your website faster, more responsive, and more scalable.
What is Caching? An Analogy for Clarity
Imagine a busy coffee shop. The first time a customer orders a complex, custom latte, the barista has to grind the beans, steam the milk, and carefully prepare the drink from scratch. This takes time. But if the barista notices that dozens of customers order the same popular drink, it makes sense to prepare a few in advance and keep them ready on the counter. The next customer who orders it gets their coffee instantly.
In this analogy, your website’s server is the barista, and the customer’s request is the coffee order. Website caching is the act of preparing and storing the finished product (your web page) so it can be delivered instantly upon request.
Technically speaking, a cache is a high-speed data storage layer that stores a subset of your website’s data – like images, multimedia, HTML files, and scripts-in a temporary location. The primary purpose of this cache is to serve future requests for that data much faster than would be possible by fetching it from its original, primary storage location (your web server).
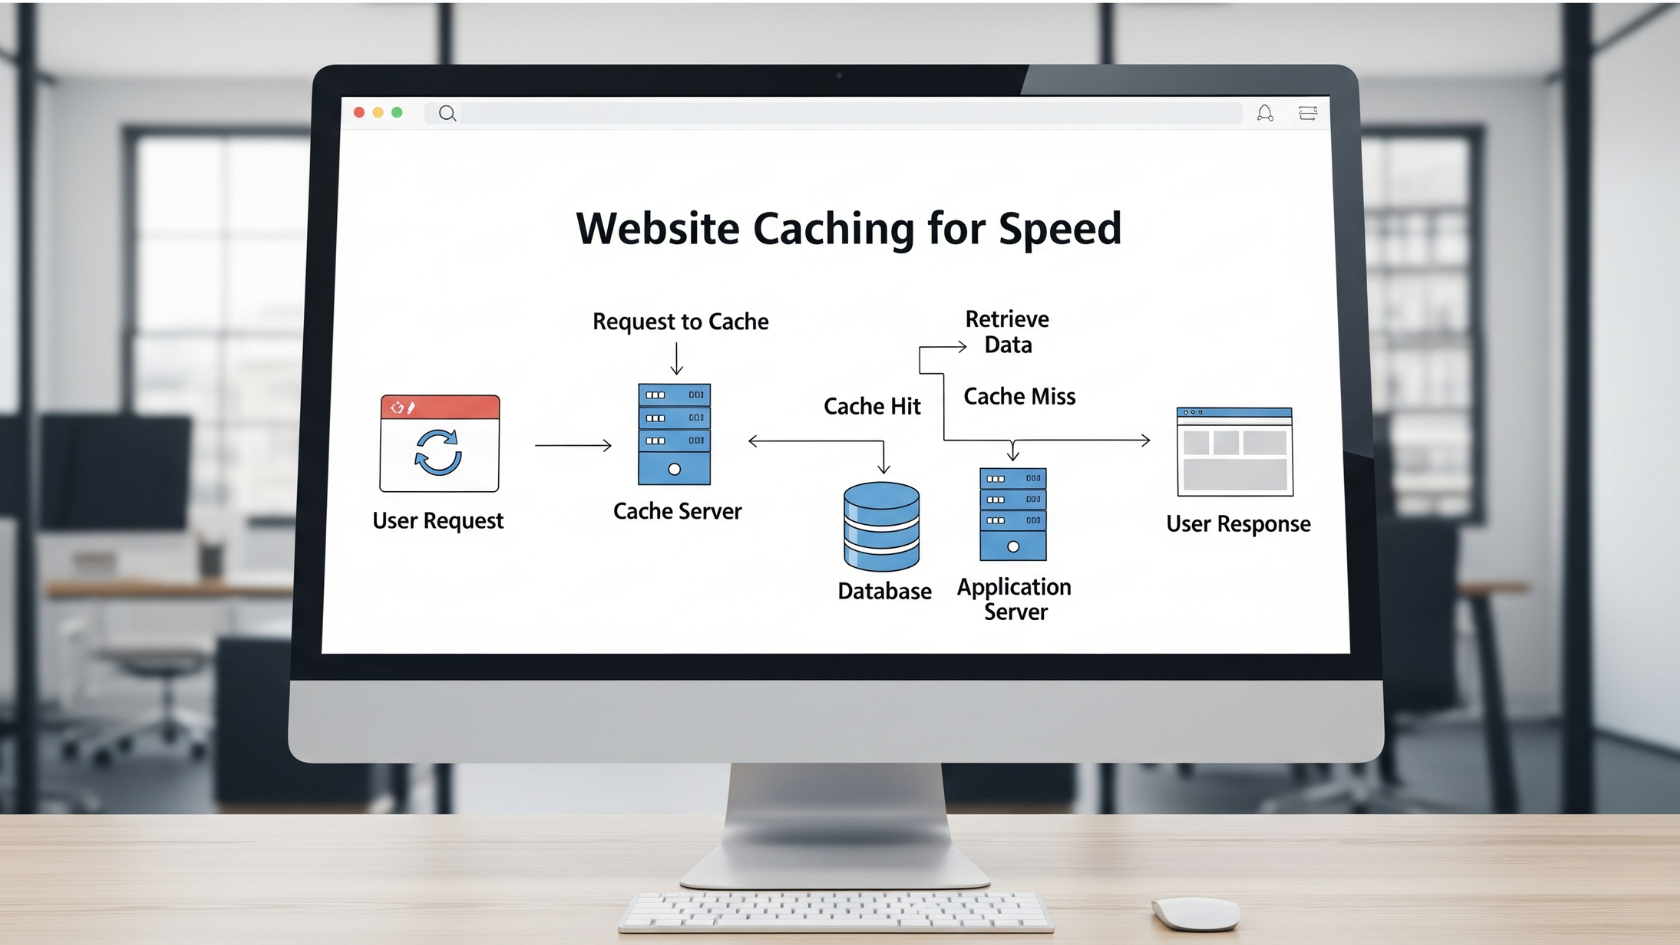
The Core Principle: How Caching Works (The Request-Response Cycle)
To understand why caching is so effective, it’s helpful to know what happens during a standard, uncached website visit. The process, known as the request-response cycle, looks something like this :
- Request: A user types your URL into their browser. The browser sends an HTTP request across the internet to your origin server (the computer where your website’s files are stored).
- Processing: The origin server receives the request and gets to work. For a dynamic website (like one built on WordPress, Shopify, or Magento), this is a resource-intensive process. The server has to execute code (like PHP), query a database to fetch content, assemble all the pieces into an HTML file, and prepare it for delivery.
- Response: The server sends the fully assembled HTML file, along with all its associated assets (CSS, JavaScript, images), back to the user’s browser.
- Rendering: The user’s browser receives all these files and renders the final, visible web page.
Every step in this cycle introduces a delay, or latency. Caching works by creating shortcuts. When a page is requested for the first time, it’s generated and stored in the cache. On subsequent requests, the server can skip the entire processing step and deliver the pre-built page directly from this high-speed memory.
This leads to two important concepts:
- Cache Hit: The requested data is found in the cache and is served immediately. This is the ideal scenario-fast, efficient, and light on server resources.
- Cache Miss: The requested data is not in the cache. The request must proceed to the origin server to be processed from scratch. The resulting data is then typically stored in the cache for the next time.
The goal of any good caching strategy is to maximize the “hit rate,” ensuring that as many users as possible are served from the cache. This not only makes the site faster for the user but also dramatically reduces the load on the server, saves bandwidth, and lowers hosting costs. This reduction in server load is not just a performance tweak; it is a fundamental architectural improvement that enhances scalability and reliability. By serving the majority of requests from a cache, a server can handle significantly more traffic without needing more powerful hardware, making the entire system more resilient to traffic spikes and even capable of serving content if the origin server temporarily goes down.
Why Caching is Critical for Google’s Core Web Vitals & User Experience
In recent years, Google has formalized how it measures user experience with a set of metrics called Core Web Vitals. These are not just abstract numbers; they are a key factor in Google’s search ranking algorithm. The three vitals are:
- Largest Contentful Paint (LCP): Measures loading performance. How long does it take for the largest, most meaningful piece of content on the page to become visible? A good score is under 2.5 seconds.
- Interaction to Next Paint (INP): Measures interactivity. How quickly does the page respond when a user clicks, taps, or types? A good score is under 200 milliseconds.
- Cumulative Layout Shift (CLS): Measures visual stability. Does the page layout jump around unexpectedly as it loads? A good score is less than 0.1.
Caching has a direct and profound impact on these metrics, especially LCP. A crucial component of LCP is Time to First Byte (TTFB)-the time it takes for the browser to receive the very first byte of data from the server. By serving a pre-built HTML file from a cache, server-side caching can slash TTFB, giving the browser a massive head start on loading and rendering the page’s main content. A fast LCP is a powerful signal to the user that your site is working and useful, which is exactly the kind of experience Google wants to reward. For a deeper understanding of how to optimize your site across the board, explore our comprehensive guide.
The First Line of Defense: Browser Caching (Client-Side)
The journey of caching begins right on your user’s device. Browser caching, also known as client-side caching, is the process where a web browser stores copies of your website’s static assetsfiles that don’t change often, like images, logos, CSS stylesheets, and JavaScript files-on the user’s local hard drive.
This is the simplest and one of the most effective forms of caching, and its primary benefit is for repeat visitors. The first time someone visits your site, their browser downloads all the necessary files. But when they navigate to another page or return to your site later, the browser can simply load the stored assets from its local cache instead of requesting them from your server all over again. This is why clicking the “back” and “forward” buttons in a browser often feels instantaneous-the page assets are already on your computer.
Decoding the Language of the Browser: A Guide to HTTP Caching Headers
How does a browser know what to save and for how long? Your server tells it to, using instructions sent via HTTP headers. These headers are invisible pieces of metadata attached to every file your server sends, and they form the rulebook for caching. Understanding them is key to taking control of your site’s performance.
Cache-Control: The Modern Standard
The Cache-Control header is the most important and versatile directive for modern caching. It gives you fine-grained control over who can cache a resource and for how long. Here are its most important directives:
max-age=<seconds>: This is the core ofCache-Control. It tells the browser how many seconds it can consider the file “fresh.” For this duration, the browser will use the cached copy without checking with the server at all. For example,Cache-Control: max-age=31536000tells the browser to cache the file for one year.public: This directive indicates that the resource can be stored by any cache, including the user’s private browser cache and shared caches like those used by a CDN or a corporate proxy. This is ideal for common assets like CSS files or your company logo.private: This restricts caching to a single user’s private cache (their browser). Shared caches are not allowed to store it. This is essential for personalized content, such as a user’s account page.no-cache: This is one of the most misunderstood directives. It does not mean “do not cache.” It means the browser can store the file, but it must revalidate with the server every single time before using it to check if there’s a newer version. This is useful for resources like an HTML file that should always be up-to-date but can still benefit from fast validation.no-store: This is the most restrictive directive. It instructs all caches (browser and intermediary) to never store any version of the file. This should be used for highly sensitive data, like banking information or medical records.
Expires: The Legacy Header
Before Cache-Control became the standard, the Expires header was used. It specifies a fixed date and time after which the resource is considered stale (e.g., Expires: Wed, 21 Oct 2025 07:28:00 GMT). While still supported, it has a major limitation: it relies on the client’s clock being accurate. The modern
Cache-Control: max-age directive is relative (e.g., “cache for one hour from now”) and is therefore more reliable. If both headers are present, max-age will always override Expires.
Validators: Checking for Updates Without Re-downloading
What happens when a file’s max-age runs out and it becomes “stale”? The browser doesn’t necessarily need to re-download the entire file. Instead, it can make a conditional request to the server, essentially asking, “I have a version of this file, is it still good?”. This is done using validator headers.
Last-Modified/If-Modified-Since: This is a time-based validation. When the server first sends a file, it can include aLast-Modifiedheader with a timestamp. The next time the browser needs the file after it has gone stale, it will send that timestamp back in anIf-Modified-Sincerequest header. If the file on the server hasn’t been modified since that time, the server responds with a tiny, empty304 Not Modifiedstatus code, telling the browser its cached copy is still valid. This saves a full download.ETag/If-None-Match: This is a more robust, content-based validation. AnETag(entity tag) is a unique identifier, like a fingerprint or hash, that represents a specific version of a file. When the file changes, theETagchanges. When revalidating, the browser sends itsETagin anIf-None-Matchheader. If the server’sETagfor the file is the same, it sends a304 Not Modifiedresponse. This is generally considered more accurate thanLast-Modifiedbecause timestamps can sometimes be unreliable.
| Directive | Description | Example Usage |
max-age | Specifies the maximum time in seconds that a resource is considered fresh. | Cache-Control: max-age=86400 (Cache for 1 day) |
public | Indicates that the response may be cached by any cache (browser, CDN, etc.). | Cache-Control: public, max-age=604800 (For shared assets like CSS) |
private | Indicates that the response is intended for a single user and must not be stored by a shared cache. | Cache-Control: private, max-age=3600 (For a user’s account page) |
no-cache | Forces caches to submit the request to the origin server for validation before releasing a cached copy. | Cache-Control: no-cache (For an HTML document that needs to be fresh) |
no-store | The cache should not store anything about the client request or server response. | Cache-Control: no-store (For sensitive financial data) |
must-revalidate | Tells caches that they must obey any freshness information you give them about a resource. | Cache-Control: max-age=3600, must-revalidate (Strictly enforces the max-age) |
Practical Implementation: .htaccess for DIY Users
For those running their website on an Apache server, one of the easiest ways to implement browser caching rules is by adding directives to your .htaccess file. This file, located in your site’s root directory, allows you to configure server behavior without editing main server configuration files.
Here are some simplified code samples you can adapt. These tell browsers to cache different file types for different durations.
# Enable Expires and Cache-Control Headers
<IfModule mod_expires.c>
  ExpiresActive On
</IfModule>
<IfModule mod_headers.c>
  Header unset ETag
  FileETag None
</IfModule>

# Cache static assets for 1 year
<FilesMatch "\.(ico|pdf|flv|jpg|jpeg|png|gif|js|css|swf)$">
  <IfModule mod_expires.c>
    ExpiresDefault "access plus 1 year"
  </IfModule>
  <IfModule mod_headers.c>
    Header set Cache-Control "max-age=31536000, public"
  </IfModule>
</FilesMatch>

# Cache frequently updated file types for 2 days
<FilesMatch "\.(xml|txt)$">
  <IfModule mod_expires.c>
    ExpiresDefault "access plus 2 days"
  </IfModule>
  <IfModule mod_headers.c>
    Header set Cache-Control "max-age=172800, public, must-revalidate"
  </IfModule>
</FilesMatch>

# Cache HTML files for 1 hour (forces revalidation)
<FilesMatch "\.(html|htm)$">
  <IfModule mod_expires.c>
    ExpiresDefault "access plus 1 hour"
  </IfModule>
  <IfModule mod_headers.c>
    Header set Cache-Control "max-age=3600, no-cache"
  </IfModule>
</FilesMatch>
This configuration sets long cache times for static files that rarely change (like images and CSS) and shorter times for files that might be updated more frequently, ensuring a good balance between performance and content freshness. For a more detailed guide on HTTP headers, the MDN Cache Control article is an excellent resource.
The Powerhouse: A Deep Dive into Server-Side Caching
While browser caching is fantastic for repeat visitors, it does nothing for first-time users. Furthermore, every “cache miss” from the browser still requires your server to do the heavy lifting of building a page from scratch. This is where server-side caching becomes a game-changer. It is a collection of techniques designed to reduce the repetitive, computationally expensive work your server has to do to generate web pages, benefiting all visitors.
For a dynamic website built on a platform like WordPress, a single page request can trigger a cascade of operations: the web server executes PHP scripts, which in turn make multiple queries to a MySQL database to fetch post content, user data, and theme options. All of this is then assembled into an HTML document and sent to the user. Server-side caching intercepts this process and stores the results of this work, so it doesn’t have to be repeated for every single visitor.
This optimization strategy isn’t a single technique but rather a stack of complementary layers, each addressing a different bottleneck in the page generation process. A highly optimized website often uses several of these layers in concert.
The Four Layers of Server-Side Caching
- Page Caching: This is the most impactful form of server-side caching. It works by taking the final, fully generated HTML of a page and saving it as a static file on the server’s disk or in memory. The next time a user requests that same page, the web server can deliver this static file directly, completely bypassing the entire PHP and database stack. The performance gain is immense, turning a dynamic page into one that loads as quickly as a simple static file. This is ideal for content that is the same for all users, like blog posts, “About Us” pages, or product category pages.
- Database Caching (Query Caching): Dynamic websites are heavily reliant on their databases. Database caching reduces this strain by storing the results of frequently executed database queries in memory. For example, if your homepage displays the 10 most recent blog posts, that query is likely run for every visitor. With database caching, the result of that query is saved. Subsequent page loads can retrieve the post list from the fast cache instead of hitting the slower database, significantly reducing database load and speeding up page generation time.
- Object Caching: This is a more granular and sophisticated form of caching. Instead of caching entire page outputs or raw database results, object caching stores specific pieces of data-known as objects-in a fast, in-memory key-value store. These objects can be anything from user session data and complex calculation results to pre-processed widget content. By storing these programmatic objects, object caching can significantly speed up the execution of complex backend logic, especially on highly dynamic sites like e-commerce stores or membership platforms where full page caching isn’t always possible.
- Opcode Caching: This layer targets the performance of the programming language itself, most commonly PHP. When a PHP script is executed, the server first has to compile the human-readable code into machine-readable instructions called bytecode (or opcodes). Opcode caching stores this compiled bytecode in memory after the first execution. For all subsequent requests, the server can skip the compilation step and execute the stored bytecode directly. This can dramatically speed up PHP execution time, reducing server CPU usage and improving overall responsiveness.
Common Tools of the Trade
Implementing these caching layers often involves specialized software. While many website owners interact with these through user-friendly plugins, it’s valuable to know the underlying technologies:
- Varnish: A powerful and highly flexible HTTP accelerator and reverse proxy. It sits in front of your main web server (like Apache or Nginx) and is a master of page caching. It can serve cached pages at incredible speeds, often improving delivery by a factor of 300-1000x.
- Redis and Memcached: These are the two most popular in-memory data stores used for object and database caching. Both are incredibly fast key-value stores. Memcached is simpler and designed purely for caching volatile data. Redis is more of a “data structure server,” offering more advanced features like data persistence (saving data to disk) and support for complex data types, making it more versatile.
- Nginx FastCGI Cache: For websites running on the popular Nginx web server, the built-in FastCGI caching module is a highly efficient page caching solution. It caches the responses from the PHP-FPM process, providing performance on par with Varnish but with a simpler server setup.
Practical Advice for WordPress and Other CMS
For the vast majority of website owners, especially those using a Content Management System (CMS) like WordPress, you don’t need to manually configure Varnish or Redis. Instead, server-side caching is typically managed in one of two ways:
- High-Performance Hosting: Many managed WordPress hosting providers build sophisticated server-side caching directly into their infrastructure. They often use a finely-tuned stack of Nginx, Varnish, and Redis, configured specifically for WordPress. This server-level caching is generally faster and more efficient than any plugin-based solution because it operates before WordPress even loads.
- Caching Plugins: If your host doesn’t provide server-level caching, a high-quality caching plugin is the next best thing. Plugins like Nitropack, RabbitLoader, WP Rocket, W3 Total Cache, or LiteSpeed Cache can implement page caching, object caching (by integrating with Redis or Memcached), and other performance optimizations directly within your WordPress installation. These plugins simplify the process, allowing you to enable powerful caching features with just a few clicks.
The Global Network: DNS and CDN Caching
So far, we’ve covered caching on the user’s device (browser) and on your web server. But there’s a vast network in between that can also be leveraged for speed. This is where DNS and Content Delivery Network (CDN) caching come into play, working to reduce the time it takes for a user’s request to even reach your server in the first place.
DNS Caching: The Internet’s Fast-Access Address Book
Before a browser can send a request to your server, it needs to know your server’s IP address (e.g., 63.46.23.184). The Domain Name System (DNS) is the global directory that translates human-readable domain names (like smartprefetch.link) into these numerical IP addresses. This lookup process, while fast, still takes time.
DNS caching speeds this up by storing the results of these lookups at various points along the network. When you visit a site for the first time, your computer asks a DNS resolver (often provided by your Internet Service Provider) for the IP address. That resolver caches the answer. The next time you (or anyone else using that resolver) visit the site, the resolver can provide the IP address instantly from its cache, skipping the full lookup process.
This cache duration is controlled by a setting in your DNS records called Time-To-Live (TTL). The TTL value, measured in seconds, tells resolvers how long they should consider a DNS record to be valid before they need to request a fresh copy. A shorter TTL allows for faster updates if you change your IP address, while a longer TTL improves performance by reducing DNS lookups.
CDN Caching: Bringing Your Content Closer to the User
The single biggest factor in network latency is physical distance. If your server is in New York and your visitor is in Tokyo, data has to travel thousands of miles across undersea cables. A Content Delivery Network (CDN) solves this problem by creating a global caching layer.
A CDN is a geographically distributed network of proxy servers, often called Points of Presence (PoPs) or edge servers. Here’s how it works:
- Caching at the Edge: The CDN makes copies of your website’s static assets (images, CSS, JavaScript) and stores them on its hundreds or thousands of edge servers around the world.
- Intelligent Routing: When a user in Tokyo tries to visit your site, the CDN’s DNS system intelligently detects their location and routes their request not to your origin server in New York, but to the nearest CDN edge server in Tokyo.
- Local Delivery: That local edge server then delivers the cached assets directly to the user. The data only has to travel a few miles instead of across the globe.
This process dramatically reduces latency and accelerates page load times for a global audience. A CDN effectively acts as a massive, distributed intermediary cache, sitting between your users and your origin server. This offloads a huge amount of traffic and bandwidth from your server, improving both performance and reliability. In this way, a CDN is more than just another server cache; it’s a fundamental architectural layer that combines server-side storage with network-level intelligence to solve the client-side problem of physical distance.
The Tangible Benefits of a Well-Cached Website
Implementing a multi-layered caching strategy isn’t just a technical exercise; it delivers concrete, measurable benefits that impact everything from user satisfaction to your bottom line. By minimizing redundant work and reducing the distance data has to travel, caching transforms your website’s performance and unlocks significant business advantages.
Quantifying the Impact on Performance and UX
- Dramatically Improved Page Load Times: This is the most immediate and noticeable benefit. Serving content from a cache -whether it’s the browser’s local storage, a nearby CDN edge server, or your server’s memory – is orders of magnitude faster than generating it from scratch on every request.
- Reduced Server Load and Bandwidth Usage: By intercepting requests before they hit your origin server, caching drastically reduces the consumption of CPU, memory, and database resources. This means your existing hosting plan can handle more traffic without slowing down, often leading to significant cost savings and preventing crashes during traffic spikes.
- Better Core Web Vitals Scores: A well-cached site is a high-performing site in the eyes of Google. Caching directly improves TTFB, which is a critical component of a good LCP score. By reducing server processing time, it enhances responsiveness, which can positively influence INP. And by ensuring assets like fonts, images, and CSS load quickly and predictably, caching helps prevent unexpected content shifts, leading to a better CLS score.
- Enhanced User Experience & Reduced Bounce Rates: Speed is synonymous with a quality user experience. When pages load quickly and interactions are smooth, users are less frustrated and more likely to stay on your site, view more pages, and engage with your content. This directly translates to lower bounce rates and higher session durations.
The Business Case: Caching’s Impact on SEO and Revenue
The performance gains from caching are not just about pleasing users; they are directly tied to business success.
- Significant SEO Benefits: Google has confirmed that page speed and Core Web Vitals are important ranking factors. A faster website provides better user signals (lower bounce rate, higher time on site), which tells Google that your site is a high-quality result. Consequently, a well-cached site is more likely to achieve and maintain higher rankings in search results, driving more organic traffic.
- Direct Impact on Conversion Rates: The link between speed and revenue is undeniable. Recent studies provide compelling statistics :
- A 1-second delay in page load time can cause a 7% reduction in conversions.
- Websites that load in 1 second have conversion rates 3x higher than sites that load in 5 seconds.
- A study by Deloitte found that a mere 0.1-second improvement in site speed led to an 8.4% increase in conversions for retail brands.
These figures illustrate a clear truth: every millisecond counts. Caching is not just an IT concern; it’s a crucial business strategy that directly impacts sales, lead generation, and overall revenue.
Common Caching Hurdles and How to Overcome Them
While the benefits of caching are immense, it’s not a “set it and forget it” solution. Implementing a caching strategy introduces its own set of challenges. Understanding these common hurdles is the first step to building a robust and reliable performance strategy.
The “Stale Content” Problem
The most frequent and frustrating issue with caching is serving stale content. This happens when the original data on your server has been updated, but the cached version has not, causing users to see outdated information. For an e-commerce site, this could mean showing an old price or an incorrect stock level. For a news site, it could mean displaying yesterday’s headlines. This not only creates a poor user experience but can also lead to lost trust and revenue.
Mastering Cache Invalidation (or “Cache Busting”)
The solution to stale content is cache invalidation – the process of telling all relevant caches (browser, CDN, server) that a piece of content is no longer valid and needs to be refreshed from the origin server. This is often called “purging” or “busting” the cache. There are several common strategies:
- Time-Based Expiration (TTL): This is the simplest method. You set a Time-To-Live (TTL) or
max-agefor your assets. Once the time expires, the cache considers the content stale. The main challenge is finding the right balance: a TTL that’s too long increases the risk of stale content, while one that’s too short reduces the performance benefits of caching. - Event-Based Purging: A more sophisticated approach is to actively purge the cache when an event occurs. For example, most WordPress caching plugins are configured to automatically purge the cache for a post when you click “Update,” or to clear the homepage cache when a new post is published. This ensures content is updated almost instantly.
- Versioning (Fingerprinting): This is the gold standard for static assets like CSS and JavaScript files. The technique involves appending a unique identifier – like a version number (
style-v2.css) or a content hash (style.a1b2c3d4.css) – to the filename. When you modify the file, the identifier in the URL changes. This forces the browser to download the new version, as it sees it as a completely new file, effectively bypassing any old cached versions. This allows you to set very long TTLs for your assets with confidence.
The Challenge of Caching Dynamic Content
Caching works best for content that is the same for everyone. It becomes much more complex for dynamic content that is personalized for each user. Pages like a user’s account dashboard, a shopping cart, or content visible only to logged-in members cannot be cached with a simple page caching strategy, as this would risk showing one user’s private information to another.
Handling this requires more advanced techniques, such as fragment caching or Edge Side Includes (ESI). These methods break a web page into smaller components (“fragments”). The static parts of the page (like the header, footer, and main content) can be cached, while the dynamic, personalized parts (like “Welcome, John!”) are fetched from the origin server and inserted into the cached template on the fly.
Troubleshooting 101: Quick Diagnostic Tips
If you suspect a caching issue on your site, here are a few simple steps to troubleshoot:
- Clear All Caches: The first step is always to purge everything. This includes your browser’s local cache, the cache created by your WordPress plugin, any server-level cache your host provides, and your CDN cache.
- Use an Incognito or Private Window: To see your site as a brand-new visitor would, open it in an incognito/private browser window. This bypasses your browser’s cache and can help you determine if the issue is client-side or server-side.
- Check the HTTP Headers: Use your browser’s developer tools (usually opened with F12 or Ctrl+Shift+I) and go to the “Network” tab. Reload the page and click on a resource (like the main HTML document or a CSS file). In the “Headers” panel, you can inspect the
Cache-Control,Expires, and other headers to see exactly what caching instructions your server is sending. This is the definitive way to see if your configuration is being applied correctly.
Beyond Caching: Proactive Speed with Predictive Prefetching
Caching is a powerful, foundational technology for web performance. However, it is fundamentally reactive. It excels at speeding up requests for content that a user has already visited or that has been requested by others. It optimizes the past. But what if you could optimize the future? This is the next frontier in user experience: moving from a reactive model to a proactive one by anticipating what a user will do next and preparing for it in advance. This is the principle behind prefetching.
How Prefetching Works (rel="prefetch")
Prefetching is a browser feature that allows you to tell the browser to download resources for a page that the user is likely to visit next. This is typically done using a <link> tag in your HTML with the attribute rel="prefetch".
For example, if a user is on a product category page, you might add: <link rel="prefetch" href="/popular-product-page.html">
When the browser sees this hint, it will use its idle time (when it’s not busy with the current page) to quietly download popular-product-page.html and its critical resources in the background and store them in its cache. If the user then clicks the link to that page, the browser doesn’t need to go to the network; the content is already there, and the navigation feels instantaneous.
This solves a critical user experience gap that caching alone cannot address. Caching makes the second visit to Page A fast. Prefetching makes the first visit to Page B (when coming from Page A) fast.
The Measurement Nuance: Lab Data vs. Field Data
Understanding the true impact of prefetching requires a crucial distinction between two types of performance measurement:
- Lab Data: This is a performance test run in a simulated, controlled environment. Tools like Google PageSpeed Insights and Lighthouse generate lab data. They load a single page under a fixed set of conditions (e.g., a mid-tier phone on a 4G network) and report on its performance for that one-time load.
- Field Data (Real User Monitoring – RUM): This is performance data collected from actual users visiting your site in the real world. This data captures the full spectrum of devices, network conditions, and user behaviors. It powers crucial reports like the Chrome User Experience Report (CrUX) and the Core Web Vitals section of Google Search Console.
Here is the critical point: lab tools only measure the performance of the current page load. Because prefetching is an optimization for a future navigation, its incredible user experience benefit – the instant loading of the next page-is completely invisible to a lab test like PageSpeed Insights. The value of prefetching is only truly captured in field data, which measures the user’s entire journey and reflects their real-world experience over time. It is clear that lab data and field data are not competitors; they are partners. Relying on one without the other gives you a dangerously incomplete picture of your website’s performance.
Natural Product Integration: Introducing Smart Prefetch
Standard rel="prefetch" is powerful, but it requires you to manually guess which links a user is most likely to click. This can be inefficient and lead to wasted bandwidth if you guess wrong. What if you could make this process intelligent and automated?
This is where the next generation of performance tools comes in. Smart Prefetch is a plugin that uses AI-based predictions to prefetch the next most likely page a user will visit before they click. By analyzing real user navigation patterns on your site, Smart Prefetch dynamically and accurately determines which resources to preload. This ensures you are only prefetching the most probable next pages, optimizing bandwidth while making the user’s entire journey feel instantaneous.
While you may not see this immediate navigational boost reflected in a Lighthouse lab score, its profound impact on user engagement and satisfaction will be evident in your real-user metrics. Over time, these improvements will surface in tools that rely on field data, like the Chrome User Experience Report (CrUX) and Google Search Console, contributing to better user signals, higher conversions, and stronger SEO performance.
Important FAQ
Can I have too many caching layers, and how do they interact?
Yes, it is possible to have conflicting or redundant caching layers, which can sometimes lead to complex issues, particularly with cache invalidation. Understanding how the layers interact is key to a successful strategy.
A request from a user’s browser typically flows through a hierarchy of caches. It will be served by the very first layer that has a valid, “fresh” copy of the requested content. The typical order is:
- Browser Cache: The browser first checks its own local storage.
- CDN Cache (Edge Cache): If not in the browser cache, the request goes to the nearest CDN PoP.
- Server Page Cache (e.g., Varnish, Nginx): If the CDN doesn’t have it, the request hits your server’s high-level page cache.
- Server Object/Database Cache (e.g., Redis): If the page needs to be generated, the application will check these caches to speed up the process.
- Origin Server (No Cache): If all caches miss, the request is processed from scratch.
The key is to ensure these layers work in harmony. Your origin server must send the correct HTTP headers (Cache-Control, ETag) to properly instruct both the CDN and the end-user’s browser on how to handle the content.
A common problem, especially in the WordPress ecosystem, is “double caching.” This can occur when a caching plugin creates its own set of static HTML files on the server’s disk, while the hosting provider is also running a more efficient, server-level page cache (like Varnish). This can lead to situations where you clear the plugin’s cache, but the server’s cache continues to serve an old version, causing confusion. In most cases, the best practice is to rely on the superior server-level cache provided by a high-quality host and use plugins to handle other optimizations that the host may not cover, such as database/object caching or file minification.
Conclusion: A Holistic Approach to Website Performance
In today’s competitive digital landscape, website performance is not a luxury-it’s a necessity. As we’ve explored, a fast, responsive, and reliable website is built upon a multi-layered caching strategy that addresses performance bottlenecks at every step of the user’s journey, from their browser to your server and across the global network.
Caching is the foundational pillar of web performance. It is the most effective way to reduce latency, decrease server load, and deliver a superior user experience. By implementing a combination of client-side, server-side, and network-level caching, you can significantly improve your Core Web Vitals, which in turn boosts your SEO rankings and, most importantly, drives business goals like conversions and revenue.
However, a truly modern performance strategy looks beyond simply optimizing past requests. The future of web performance lies in a holistic approach that combines the reactive power of caching with the proactive, user-centric benefits of predictive prefetching. By not only serving repeat content instantly but also anticipating and preloading a user’s next move, you can create a truly seamless and instantaneous browsing experience that sets your website apart from the competition.
Ready to go beyond caching and make your user’s entire journey faster? Try Smart Prefetch now.