Your website’s speed is a crucial factor for user experience, SEO, and ultimately, your business success. Slow loading times can lead to high bounce rates and lost conversions. This comprehensive guide will walk you through implementing Smart Prefetch on your WordPress website and WooCommerce store to achieve lightning-fast navigation.
1. Introduction
For WordPress and WooCommerce site owners, keeping your website snappy is paramount. Smart Prefetch is a powerful plugin designed to significantly enhance your site’s performance by making page loads feel instantaneous.
Smart Prefetch leverages intelligent algorithms to predict user navigation patterns on your website. Instead of waiting for a user to click a link, the plugin intelligently preloads the most likely next pages into their browser’s cache. This means that when a user does click, the page is already there, ready to be displayed almost instantly.
Key Benefits for WordPress/WooCommerce Sites:
- Faster Page Loading: Dramatically reduces the perceived load time for subsequent page views, making your site feel incredibly responsive.
- Improved User Experience: Provides a seamless and fluid Browse experience, keeping visitors engaged and reducing frustration.
- Reduced Bounce Rates: Visitors are less likely to leave a fast-loading site, leading to higher engagement.
- Enhanced SEO (Indirectly): While not a direct SEO factor, improved user experience and lower bounce rates can positively influence your search engine rankings.
How it Works:
Smart Prefetch’s core intelligence lies in its AI-powered prediction engine. It continuously analyzes visitor behavior on your WordPress or WooCommerce site, identifying common pathways and popular next steps. For example, if many users view a specific product and then proceed to its related products, Smart Prefetch learns this pattern and will prefetch the related products page. This anticipatory loading is entirely automated, requiring minimal configuration from your end.
2. Installation Guide
Installing Smart Prefetch on your WordPress website is a straightforward process, similar to installing any other plugin.
Step-by-step WordPress Plugin Installation (Recommended Method):
- Login to your WordPress Admin Dashboard: Go to
yourdomain.com/wp-adminand enter your credentials. - Navigate to Plugins: In the left-hand sidebar, hover over “Plugins” and click on “Add New”.
- Search for Smart Prefetch: In the search bar on the right side of the “Add Plugins” page, type “Smart Prefetch” and press Enter.
- Find the Plugin: You should see “Smart Prefetch” by the developer.
- Install the Plugin: Click the “Install Now” button next to the Smart Prefetch plugin.
- Direct Link: You can also find the plugin directly at: https://wordpress.org/plugins/smart-prefetch/
- Activate the Plugin: Once installed, the “Install Now” button will change to “Activate”. Click “Activate” to enable the plugin on your website.
Alternative Installation (Manual Upload):
If for any reason you can’t install directly from the WordPress repository (e.g., firewall restrictions), you can upload the plugin manually:
- Download the Plugin: Go to https://wordpress.org/plugins/smart-prefetch/ and click the “Download” button to get the plugin’s
.zipfile. - Login to your WordPress Admin Dashboard: Go to
yourdomain.com/wp-admin. - Navigate to Plugins: Hover over “Plugins” and click on “Add New”.
- Upload Plugin: At the top of the “Add Plugins” page, click the “Upload Plugin” button.
- Choose File: Click “Choose File”, select the downloaded
smart-prefetch.zipfile from your computer, and then click “Install Now”. - Activate the Plugin: After the upload and installation are complete, click “Activate Plugin”.
3. Getting Started
Once the Smart Prefetch plugin is activated on your WordPress site, the next step is to connect it to the Smart Prefetch service dashboard. This is where the magic happens, as the dashboard provides the AI engine and analytics.
Creating an Account at https://dash.smartprefetch.link/
- Open the Dashboard URL: Go to https://dash.smartprefetch.link/ in your web browser.
- Sign Up: Click on the “Sign Up” or “Create Account” button.
- Enter Details: Provide your email address, create a strong password, and agree to the terms of service.
- Verify Email: You may receive an email verification link. Click on it to activate your account.
Adding Your WordPress/WooCommerce Website to the Dashboard
- Login to Your Smart Prefetch Dashboard: After creating and verifying your account, log in at https://dash.smartprefetch.link/.
- Add New Website: Look for an “Add Website” or “New Site” button or option within your dashboard.
- Enter Website URL: Input your full WordPress/WooCommerce website URL (e.g.,
https://www.yourdomain.com). - Follow On-Screen Instructions: The dashboard will guide you through connecting your site. This usually involves generating an API key or a unique site ID that you will then paste into your WordPress plugin settings.
Understanding the Dashboard Interface
The Smart Prefetch dashboard is your central hub for monitoring and managing the prefetching service.
- Overview: Provides a snapshot of your site’s performance and prefetching activity. It also show the estimated conversion lift based on industry standards.
- Reports: Detailed analytics on prefetching, including confidence levels, success rates, and detected navigation patterns.
- Settings: Manage your account, billing, and site-specific configurations.
4. Configuration for WordPress Sites
Smart Prefetch is designed to be largely “set and forget,” but there are some basic settings and considerations for optimal performance on WordPress.
Basic Plugin Settings
After connecting the plugin, access its settings via Dashboard. While the plugin is largely automated, you might find options like:
- Enable/Disable Prefetching: A toggle to quickly turn the service on or off. Keep this enabled for performance benefits.
- Data Collection Status: Often shows if the plugin is actively sending data to the Smart Prefetch service.
Recommended Configurations for Different Site Types
Smart Prefetch adapts to most WordPress site types automatically.
- Blogs/Content Sites: The AI will focus on predicting navigation between posts, categories, and tags. No special configuration is usually needed.
- Brochure/Business Sites: Focus on key service pages, contact forms, or portfolio items. Smart Prefetch will learn how users navigate through your offerings.
- WooCommerce Stores: (Covered in detail in the next section)
Performance Optimization Settings
Smart Prefetch works best when it’s the primary prefetching solution. It’s generally not recommended to combine it with other prefetch/prerender plugins, as this can lead to conflicts or redundant actions.
- Caching Plugins: Smart Prefetch is compatible with most popular caching plugins (e.g., WP Rocket, LiteSpeed Cache, WP Super Cache, W3 Total Cache, RabbitLoader, Nitropack). Ensure your caching plugin is configured to not perform its own link prefetching or prerendering, as Smart Prefetch handles this intelligently.
- Pro Tip: If your caching plugin has a “delay JavaScript” or “defer JavaScript” option, it’s okay to defer the Smart Prefetch script (which loads from
smartprefetch.link) as well.
- Pro Tip: If your caching plugin has a “delay JavaScript” or “defer JavaScript” option, it’s okay to defer the Smart Prefetch script (which loads from
- Minification/Concatenation Plugins: Smart Prefetch’s script is already highly optimized and minified. Ensure that other minification plugins do not inadvertently break the Smart Prefetch script by overly aggressive minification or concatenation.
- No Manual Preload/Prefetch Tags: Avoid manually adding
<link rel="prefetch">or<link rel="prerender">tags to your theme or other plugins for pages, as Smart Prefetch automates this process more intelligently. You can still use these tags for prefetching page assets like images or CSS.
Cache Compatibility Considerations
- Server-Side Caching: If your hosting provider offers server-side caching (e.g., LiteSpeed, Nginx caching), Smart Prefetch will typically work fine as it operates on the client-side (browser) after the initial page load.
- CDN Integration: If you use a Content Delivery Network (CDN), no additional settings is needed. Smart Prefetch is compatible with all modern CDNs.
5. WooCommerce-Specific Setup
WooCommerce stores have unique navigation patterns, and Smart Prefetch is optimized to enhance these critical user journeys.
Special Considerations for Online Stores
WooCommerce introduces specific pages like product pages, cart, checkout, and account pages, which are crucial for conversions. Smart Prefetch excels at optimizing transitions between these.
Product Page Optimization
- Product to Related Product: The AI will learn if customers frequently jump from one product to related items, automatically prefetching those.
- Product to Category: If users often navigate from a product back to its category page, Smart Prefetch will anticipate this.
- Product to Add to Cart: This is a key prefetching target. Smart Prefetch can significantly speed up the perceived “add to cart” action by preloading the cart page or a “mini-cart” update.
Cart and Checkout Page Handling
- Add to Cart to Cart Page: When a user adds an item to the cart, Smart Prefetch often preloads the cart page or the next step in the checkout flow. This is critical for reducing friction in the purchasing process.
- Cart to Checkout: This is another high-impact area. Smart Prefetch can preload the initial checkout page, making the transition seamless.
- Important Note: Sensitive pages like the checkout (especially after initial load) and “My Account” are handled carefully by Smart Prefetch to avoid preloading personalized or dynamic content that changes frequently, ensuring data integrity and security.
Category and Search Page Prefetching
- Category to Product: As users browse categories, Smart Prefetch will predict popular product clicks and preload those product pages.
- Search Results to Product: Similarly, after a search, the AI will learn which search results are most frequently clicked and prefetch those product pages.
No specific manual setup is usually required for WooCommerce. The AI automatically detects your WooCommerce pages and optimizes prefetching based on actual customer behavior.
6. Monitoring and Analytics
The Smart Prefetch dashboard provides invaluable insights into how the service is performing on your website. The dashboard displays several key performance indicators (KPIs) to show the impact of the plugin on your website’s speed and potential conversions.
Accessing Your Smart Prefetch Dashboard
- Go to https://dash.smartprefetch.link/ and log in with your credentials.
- Select the WordPress/WooCommerce site you wish to monitor from your list of connected sites.
Understanding Prediction Reports
The “Reports” or “Analytics” section of your dashboard will show you detailed information about the prefetching activity. This can include:
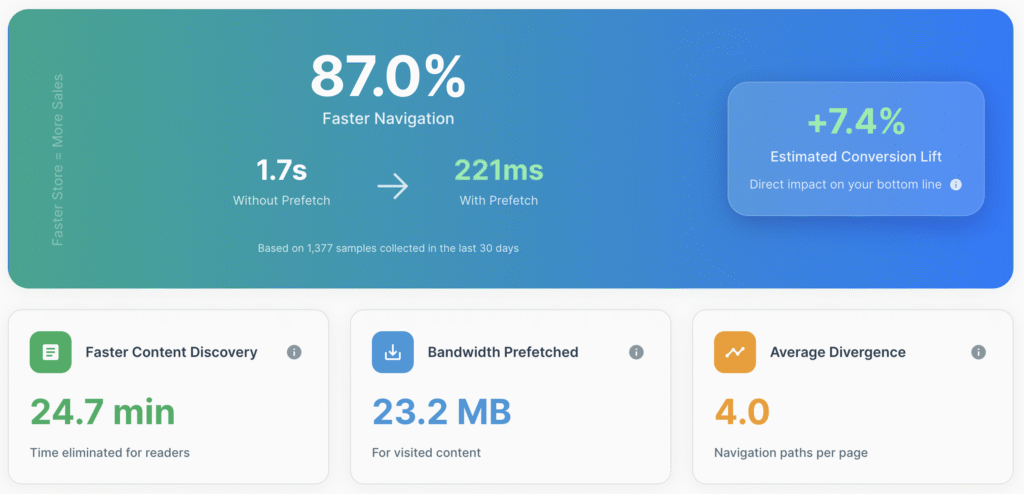
- Faster Navigation: This metric shows the percentage by which your website’s navigation has become faster. For example, if the average load time was significantly reduced from 1.7 seconds to 221 milliseconds, it shows an 86% faster navigation.
- Estimated Conversion Lift: This estimates the percentage increase in conversions you can expect due to the improved load times. The tool predicts this based on industry research data.
- Time Saved: This KPI indicates the total amount of time saved for your website visitors by prefetching pages. For WooCommerce store, it is often faster time to checkout.
- Bandwidth Prefetching: This shows the amount of bandwidth saved by prefetching only the pages that were actually visited by users.
- Trial Plan Usage: If you are on a trial, this section shows your usage and ensures the plugin integration is working correctly
7. Troubleshooting Guide
Even with intelligent systems, issues can sometimes arise. Here’s how to troubleshoot common Smart Prefetch problems on your WordPress/WooCommerce site.
Plugin not appearing in WordPress admin after installation
- Check
wp-content/pluginsdirectory: If you installed manually via FTP, ensure the plugin foldersmart-prefetchis correctly uploaded towp-content/plugins/. - Verify Plugin is Active: Go to WordPress Admin → Plugins → Installed Plugins. Look for “Smart Prefetch”. If it’s there but says “Activate”, click it. If it’s not listed, try re-installing it using the methods in Section 2.
Smart Prefetch not working after activation
- Verify Plugin is Active in WP Admin → Plugins section: As above, confirm it’s activated.
- Allow Time for Data Collection: Smart Prefetch needs 24-48 hours to collect initial user behavior data and start making predictions. If it’s a new installation, give it time.
- Verify Website Traffic: For the AI to learn, your site needs a reasonable amount of traffic. Very low traffic sites might see slower initial results.
Theme compatibility issues
- While Smart Prefetch works with most themes, highly customized or older themes might have conflicts.
- Switch to a default WordPress theme (e.g., Twenty Twenty-Four): Temporarily activate a default theme. If Smart Prefetch starts working, the issue is theme-related. Contact your theme developer for assistance or use a different theme.
How to test if prefetching is working
- Open Developer Tools (Chrome recommended): On your website, right-click and choose “Inspect.”
- Go to Network Tab: In the developer tools, navigate to the “Network” tab.
- Filter by “Prefetch” or “Speculation Rules”: In the filter bar, type “prefetch” or look for requests initiated by “SpeculationRules” (if your browser supports the latest API).
- Browse Your Site: As you hover over links or click through pages, you should see network requests appear with a “prefetch” initiator or similar. This indicates Smart Prefetch is actively preloading pages.
- Alternatively, some browsers might show preloaded resources in the “Application” tab under “Cache Storage” (though this is less common for dynamic prefetching).
8. Best Practices
To get the most out of Smart Prefetch and ensure continuous, optimal performance.
Optimal settings for different WordPress configurations
- Keep it Simple: Smart Prefetch is highly automated. The best “setting” is often to let the AI do its job without excessive manual intervention.
- Focus on Core Web Vitals: While Smart Prefetch mainly impacts FID/INP by reducing navigation latency, ensure your site also has good LCP by optimizing images, fonts, and server response time. It is recommended to use on-page assets optimization tools to ensure page assets are loading faster.
When to exclude certain pages from prefetching
Smart Prefetch is designed to handle this intelligently by avoiding sensitive or highly dynamic pages (like checkout steps after the initial load, or account pages) that could lead to issues if preloaded. However, if you have very specific pages you never want prefetched (e.g., extremely resource-intensive custom scripts that only run once), you will find an exclusion option in advanced settings dash.smartprefetch.link or need to contact support for custom configuration.
Managing prefetch limits and quotas
- Smart Prefetch operates on a usage-based model (number of predictions/prefetches that visitor actually visited, called as accelarated pageview). Your plan details on
dash.smartprefetch.linkwill outline any limits. - The AI is designed to be efficient, not wasteful. It won’t endlessly prefetch pages that aren’t likely to be visited. Any prefetched page that a visitor never navigated to is not counted towards the billing quota.
- Monitor your usage in the dashboard to ensure you’re on the right plan for your site’s traffic.
Performance monitoring recommendations
- Regularly Check Dashboard: Log into your Smart Prefetch dashboard weekly or bi-weekly to review KPIs and ensure the service is running smoothly.
- Use Speed Testing Tools: Periodically use tools like Google PageSpeed Insights, GTmetrix, or WebPageTest to monitor your overall site performance. While Smart Prefetch improves perceived speed on subsequent clicks, these tools measure initial load times, giving you a holistic view.
- Real User Monitoring (RUM): For advanced users, integrate a RUM solution (e.g., Google Analytics 4, Hotjar, Clarity) to track actual user experience metrics like navigation timing, which can directly reflect Smart Prefetch’s impact.
9. Advanced Features
For developers and advanced users, Smart Prefetch offers flexibility and integration possibilities.
Custom integration options
While the WordPress plugin handles most of the integration, the core Smart Prefetch service uses standard web technologies like JavaScript and the Speculation Rules API. This means it’s adaptable to custom WordPress setups.
Developer hooks and filters
The Smart Prefetch WordPress plugin may offer developer hooks and filters that allow you to programmatically control its behavior. Check the plugin’s documentation for most up-to-date or contact support for actual available hooks.
Manual JavaScript integration for custom themes
If you have a headless WordPress setup or a highly custom theme without a traditional plugin structure, you might be able to integrate Smart Prefetch directly via its JavaScript library. This would involve:
- Obtaining the core JavaScript snippet from your Smart Prefetch dashboard.
- Embedding this snippet directly into your theme’s
header.phporfunctions.php(for proper enqueueing). - Ensuring the necessary API key/site ID is passed correctly.This approach requires strong technical expertise.
API integration possibilities
The Smart Prefetch service runs on a robust backend. For highly customized needs, there are API endpoints available for deeper integration, custom data analysis, or dynamic control over prefetching rules. This is typically for enterprise-level users or those with specific development requirements. Contact support if you have such needs.
10. FAQ Section
Here are answers to some frequently asked questions about Smart Prefetch for WordPress and WooCommerce.
Q: Does it work with all WordPress themes?
A: Yes, Smart Prefetch is designed to be compatible with virtually all WordPress themes, as it operates by injecting a small JavaScript snippet into your site’s frontend. It does not rely on specific theme structures.
Q: Is it compatible with popular plugins like Yoast SEO, Elementor, and other caching plugins?
A: Yes, Smart Prefetch is built with broad compatibility in mind.
- SEO Plugins (Yoast, Rank Math): Fully compatible, as prefetching does not interfere with SEO indexing or content.
- Page Builders (Elementor, Divi, Beaver Builder): Works seamlessly, as the prefetching occurs after the page is built and rendered by the browser.
- Caching Plugins (WP Rocket, LiteSpeed Cache, W3 Total Cache, Nitropack, RabbitLoader): Generally compatible. Crucially, you must disable any prefetching or prerendering features within these other caching plugins to avoid conflicts and ensure Smart Prefetch’s AI-driven approach is the primary method.
Q: What is the impact on site speed and server resources?
A: Smart Prefetch’s primary impact is on perceived site speed for subsequent page loads, making navigation feel instant.
- Server Resources: The plugin itself is very lightweight. The prefetching requests are small and typically happen during idle browser time. For the server, it means a slightly earlier request for the next page, but overall resource consumption is highly optimized. It’s designed to be efficient and not overload your server.
- Client-side (Browser) Resources: Prefetching uses minimal browser resources, as it loads resources into the cache during idle time. It’s designed not to hinder the current user experience.
Q: Is it compatible with mobile devices?
A: Absolutely. Smart Prefetch is fully compatible and highly beneficial for mobile users. Faster navigation is even more critical on mobile, where network conditions can be less stable. The AI adapts its predictions for mobile user behavior.
Q: Are there any SEO implications?
A: Smart Prefetch has positive indirect SEO implications. Search engines like Google favor fast-loading websites and positive user experiences. By significantly improving page load times for subsequent navigation and reducing bounce rates, Smart Prefetch contributes to a better user experience, boosting CWV/CrUX health which leads to improved search engine rankings. It does not negatively impact crawlability or indexing.
11. Support and Resource
Should you need any assistance or want to dive deeper, we’re here to help. For any technical issues, questions about your account, or detailed assistance, please reach out to our support team directly at https://smartprefetch.link/contact-us/.
When contacting support, please include:
- Your WordPress website URL.
- A detailed description of the issue.
- Any error messages you’re seeing (from the browser console or WordPress debug logs).
- Screenshots if helpful.
Dashboard access for detailed analytics
Remember, your primary resource for monitoring Smart Prefetch’s performance and usage is your dedicated dashboard:
- Dashboard URL: https://dash.smartprefetch.link/
Log in regularly to review your KPIs, prediction reports, and ensure everything is running smoothly.
Community resources and documentation
While specific community forums might be developing, this comprehensive knowledge base article serves as your primary documentation. We will continually update it with new features and common solutions.
Update and maintenance information
- Automatic Updates: Ensure your WordPress site has automatic plugin updates enabled for Smart Prefetch. This ensures you always have the latest features, performance improvements, and bug fixes.
- Regular Plugin Checks: Periodically check your “Plugins” section in WordPress admin to ensure all plugins, including Smart Prefetch, are updated and active.
- Stay Informed: Follow Smart Prefetch’s official channels (website, social media) for announcements regarding new features or important updates.
We are dedicated to making your WordPress and WooCommerce sites faster and more enjoyable for your visitors. With Smart Prefetch, you’re not just speeding up your site; you’re enhancing the entire user journey to boost conversion.